This post may contain affiliate links. If you make a purchase through links on our site, we may earn a commission. And if you do that, you are AWESOME!!! Thanks :)
So you’ve got a Cricut machine and you’re wanting to start making those beautiful signs to decorate your home, but how to get started you ask? Well I’m here to give you 2 thorough step by step guides on How to Make a Wood Sign Using Stencils and Cricut Design Space.
The first guide will show you how to make the stencil using an uploaded/pre-made design. The second guide of this post will show you how to make the stencil using a design you make in Cricut Design Space, no upload necessary. So let’s get to it!
Gather Your Supplies
First gather all of your supplies:
-Wood Plaque/Sign
-Stencil brushes
-Painter’s tape for holding stencil in place (optional)
-Paint, acrylic, latex, or chalk paint works great for stencil application
-Paint, stain and sealer for the wood sign
-Either a design to upload or a design you make in Cricut Design Space
Now that you’ve got all your materials gathered, it’s time to move to the computer and to the first method of making a stencil and that is using an uploaded design.
Method 1: Using an uploaded/pre-made design
*Note-This method is if you’re using a pre-made design.
There are thousands of beautiful designs out there for signs.
Etsy, Creative Market, and blogs are some great places to search for designs.
Etsy and Creative Market have fairly inexpensive designs for sale; don’t forget to check the terms of use, and whether it’s available for personal or commercial use and what their specifications of those terms means to that particular designer.
Hey don’t forget I also have some free designs you can use to make stencils for personal use, right here on the blog.
Just remember again that if you’re planning on making a stencil using non-adhesive material then you need to make sure that it is stencil ready.
Check out this post to see if the design you’re looking at works as a stencil ready design.
Step 1: Open Cricut Design Space
First open Cricut Design Space on your computer and log into Cricut Design Space and click on “New Project”.
Step 2: Click Upload

Step 3: Upload Image
Next click on the “Upload Image” Button to upload the design.

Step 4: Click on Browse
Click on the “Browse” button to find the design/file from where you’re uploading it from.
Follow steps 4-13 if you’re uploading a jpg, bmp, gif, or png file.
If you’re uploading an SVG file then you can skip steps 5-8, and just upload the SVG file and save then continue to follow steps 9-13.

Step 5: Click on Image Type
Once the image is uploaded click on the appropriate image type.
I have always just clicked on Simple when making stencils.
After the image type is selected click on “Continue”.

Step 6: Select and Erase
Click on the “Select and Erase” wand icon. Then click on the white area of the uploaded design. Click on “Continue”.

Step 7: Blue and White Checkered Background
The white area should now be a blue and white checkered background, showing that it’s now transparent. Next click on “Continue”.

Step 8: Save as Cut Image
Click on the box above the text that says “Save as a Cut Image”. Then click “Save”.

Step 9: Click on Uploaded Image
Click on the uploaded image and then click on “Insert Images” button.

Step 10: Resize Image
Once the design is uploaded, you can resize the image to the desired dimensions.
When the dimensions are set and it all looks good, click on “Make It”.

Step 11: Mat Image
Next you’ll see how the cut will look on the mat. If everything looks good on the mat click “Continue”.

Step 12: Select Material Setting
Make sure to select the correct material setting.
I wrote a tutorial, How to Make Stencils Using Show-OFFS Stencil Blanks and Cricut Design Space if you would like more information on the process for those particular stencils and the settings I use.

Step 13: Follow Cricut Design Space Directions
Next follow the directions given by Cricut Design Space to complete the cutting of the stencil.
After all the steps and directions have been completed you should have a beautiful stencil that can be used to make a wood sign.
Method 2: Making a Stencil Design in Cricut Design Space
Now that we’ve covered how to make a stencil using an uploaded or pre-made design, let’s talk about making a design right in Cricut Design Space.
Step 1: Open Cricut Design Space
Open and log into Cricut Design Space and click on “New Project” to get started.
Step 2: Click on Text
Once you’ve created a new project, you can click on the “Text” icon to create a text in Cricut Design Space.

Step 3: Type Text
Just type the text that you want on your sign in the text box.

Step 4: Select the font
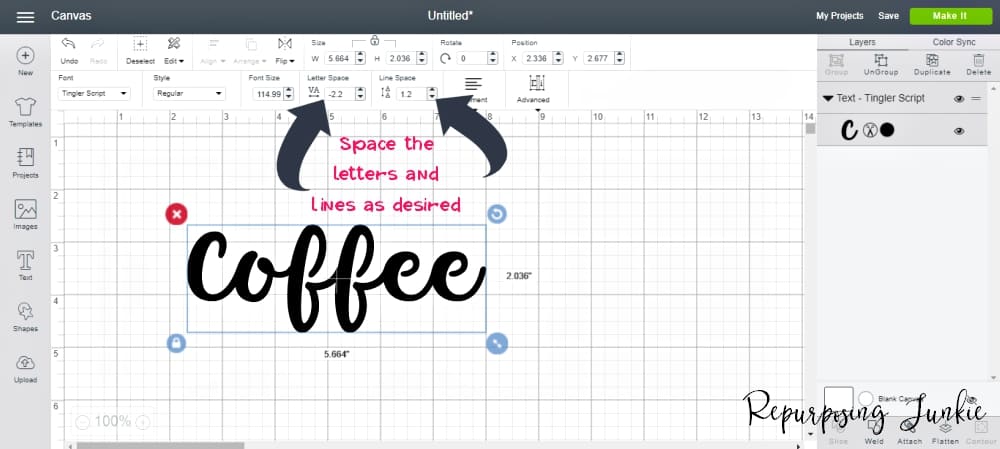
For the sake of brevity in this tutorial, I am using a stencil font that I have purchased from this Creative Market shop, called Tinger Script.
You can search Creative Market for other “Stencil Fonts” as well.
For a more in-depth post on making non-adhesive type stencils with regular/non-stencil fonts please read this post, How to Keep Letters Intact When Making Stencils in Cricut Design Space.

Step 5: Space Letters and Lines as Desired
You can space the letters as close or far apart as you want, as well as the lines.
Since I’m working with a script font here I want the letters to be connected as one continuous word, so I chose to narrow the spacing between the letters until they were connected.
Step 6: Resize the Design
Resize the design to whatever dimension you want your stencil to be.

Step 7: Click “Make It”
When the stencil design looks good click “Make It”.

Step 8: Mat Preview
Cricut Design Space will give a mat preview of what the cut will look like on the mat. If everything looks good click “Continue”.

Step 9: Select Material
Select the correct material for your stencil material.
As I mentioned above I like to use the SHOW-OFFS Stencil blanks and I have it adjusted to cut through those particular stencil blanks.
For more information on how to use the SHOW-OFFS Stencils blanks and the settings I use, you can check that out here.

Step 10: Follow Cricut Design Space Directions
Follow the directions given by Cricut Design Space to complete the cut.
After all the steps and directions have been completed you should have a stencil that can be used to make a beautiful sign.
Stencil a Sign
Step 1: Time to Stencil
Okay, whether you have used Method 1 or Method 2 for cutting your stencil in Cricut Design Space, you’ll have a stencil that you’re ready to use, so let’s get to stenciling a sign.
Step 2: Prepare Wood Sign
Prepare the wood sign/plaque. You can choose whether you want to paint, stain or leave the wood natural.
This piece of scrap wood was sanded smooth, but was left with some of the rustic characteristics in it for effect.
The scrap wood was painted with 2 coats of white latex paint, sanding with 220 grit when it was dry, after each coat.
Follow the manufacturer’s instructions on using sandpaper and sanding equipment.

Step 3: Tape stencil (optional)
You can use painter’s tape to secure your stencil to the wood sign to keep it from slipping.
Holding the stencil with one hand and stenciling with the other hand also works, and if the stencil moves it can be lined back up.
Step 4: Apply Stencil
Load a very small amount of paint on a stencil brush or pouncer or your choice of stencil application.
After the paint has been loaded, try to get as much paint off the stencil brush while leaving a very small amount on.
I am using black acrylic paint and I just poured some in an old jar lid; latex paint works as well for stencil application.
As you can see I’m unloading and pouncing paint off my stencil brush onto a piece of cardboard, leaving a very small amount on the brush.
I believe the key to a great stencil job is the amount of paint being used, in this case less is more.
To see more details on this check out this post I wrote, How to Stencil: a Beginner’s Guide.

Step 5: Remove Stencil
Once your stencil is applied to your wood sign, and it’s dry, you can remove the stencil. I usually remove it right away because I’m impatient like that. ;)

Step 6: Seal Sign
You can seal your sign with wax, polyurethane, polycrylic or whatever sealant you choose.
I usually seal my painted signs with wax.
The manufacturer’s labels will inform you how to apply the different types of sealers and what they are best used on.
Step 7: Enjoy
Step back and enjoy your beautiful work! :) You did an awesome job!
Pin this for later

